Reviewing the OpenBCI Hardware
After working with the OpenBCI hardware for about a 3/4 year, I feel inclined to write down the points that bothered me, and should be addressed in the next revisions, or forks.
This review refers to the 8 Bit Arduino version of the OpenBCI, which is now discontinued.
Price
The baseline version of OpenBCI is listed in the Shop for 499$ now. Considering that the most expensive part with around 50$, and the remaining electronics parts should be below that. With the PCB and assembly, I estimate the manifacturing cost to be well below 150$, so I could at least attest the OpenBCI guys an enterprising attitude. The price maybe can be justified by comparing the competition, which today is mostly the medical and research suppliers, who charge even more ridiculous prices.
Radio Link
The biggest downside of the OpenBCI is the required use of the bluetooth dongle. So why can’‘t the OpenBCI link directly with a laptops integrated bluetooth? The reason lies in the Bluetooth module, the RFDuino, which only supports 2 modes: Bluetooth Low Energy (BLE), and the proprietary Gazelle stack. The OpenBCI includes a switch to choose between the two modes. While BLE uses less power, and can connect to most modern smartphones and other bluetooth dongles, it has a very limited data rate, something in the range of 32 kbps. This is probably the reason why the BLE mode of the OpenBCI is not implemented to this day. The other choice is the Gazelle stack, a proprietary “high speed” protocol based on Bluetooth. This is only usable with nRF chips from Nordic Semiconductors, that is used in the RFDuino. Still the RFDuino solution has very limited bandwidth. While the bluetooth link might allow up to 500 ksps, the bottleneck is the serial link between the OpenBCI µC and the RFDuino is limited to 115.2 kbps. This is explained in more detail here
I wondered why they did not use the popular HC-05 Bluetooth module, which is said to support up to 1.3 Mbps of bandwidth as a serial link. My guess is that the RFDuino allows over-the-air programming of the µC, which avoids the safety risk of of someone attaching himself to a faulty power supply over a programming cable without any galvanic isolation.
Battery Situation
Then OpenBCI comes with an AA battery holder as power source. Since the 8 Bit version requires 6-12V input (the Arduino µC operates at 5V), it needs a pack of 4 AA batteries, which means quite a lot of weight when mounted to the Ultracortex. Over last 6 months of experimenting, i only had to change the batteries once. I have not tried rechargable NiMH cells.
Some people recommend using a 3.7V Lithium cell, which is enough for the 32 bit board, which works on 3.3V. On the 8 Bit board, one had either to use 2 Lithium cells, which complicates charging, or use a step-up converter, like this: https://www.sparkfun.com/products/10968
Noise Performance
Since we are dealing with super-tiny signals in the microvolt (µV) range, the noise performance is one of the main performance characteristics of an EEG amplifier system.
The noise levels of operational amplifiers is often specified as Vpp/sqrt(Hz). But this value only applies above a certain frequency, because there is another kind of noise that increases with lower frequencies, the 1/f noise, or sometimes “flicker noise”. This one is often not specified (which means the opamp has poor noise performance in this range), and if specified, measured as Vpp in a given frequency range, like 1-10 Hz. The best amplifier i could find is the AD8422, which can achieve 0.15 µVpp at 0.1-10 Hz.
The ADS1299 specifies a noise level of 1µV peak-to-peak voltage in the 0.01 Hz to 70 Hz band.
The different frequency band makes them difficult to compare, but is doing a good job on the noise department. In the best case, it still could be improved by almost an order of magnitude by adding a active electrode preamplifier based on the AD8442. I will try this and report the results.
Another noise characteristic is the increasing noise when the input impedance (electrode condition) goes up. That one can usually not be predicted from the datasheet, but input bias current might be an indicator.
The brain-duino uses the OPA2111 as a frontend. I did some tests with the developer of brain-duino, comparing the noise levels at different input resistances to the test signal source. The brain-duino has almost no noise increase up to 1 MegaOhm, while the OpenBCI needs to be well below 100 kOhm to deliever good noise performance. The downside of the OPA2111 is that it is quite expensive (16 € at RS Components), and it’’s 1/f noise performance is not as good, with 1.5µVpp at 0.1-10Hz. From my experience, using the Ultracortex there is no need for such high input impedances, since i usually get an impedance reading below 50 kOhm with dry electrodes, without any site preparation. One exception arises when using a monopolar setup, using one electrode (called SRB1/2 on the OpenBCI) which acts as a common reference to all 8 channels. This signal is not actually buffered inside the chip, but directly routed to all the inputs with analog switches. This means that the input bias current increases by a factor of 8, thus requiring one eighth of the impedance to get the same noise performance. In the user manual of the ADS1299 Evaluation board, Texas Instruments actually recommends the use of a buffering opamp here (like OPA376).
Electrode Setup
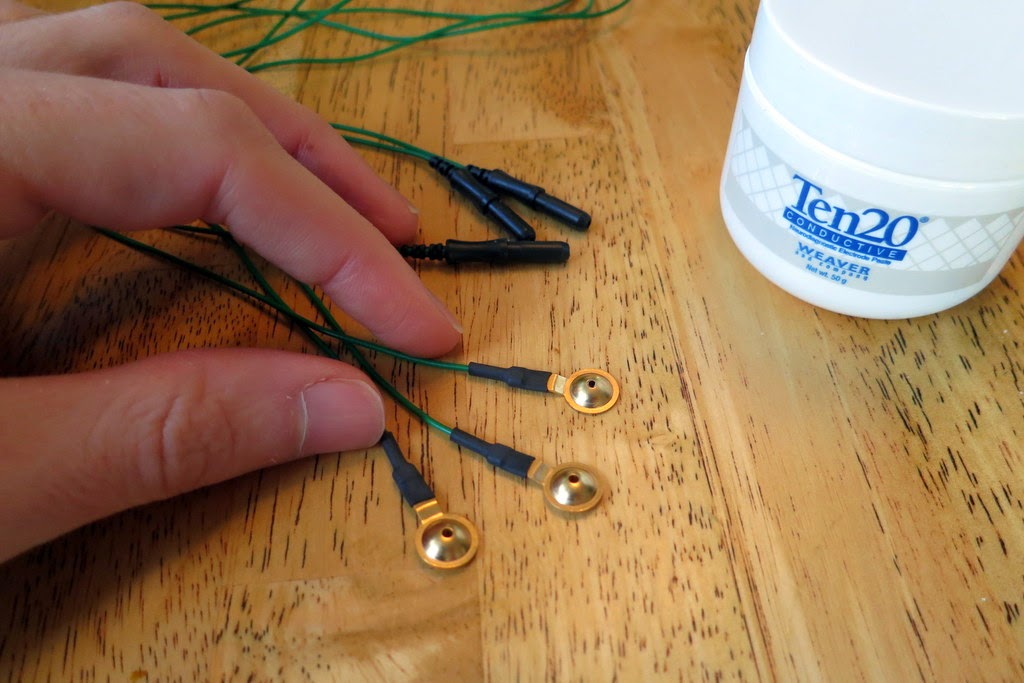
My first experiences with the OpenBCI began with the supplied gold cup electrodes, and the accompanying Ten20-Paste. The sticky paste is suitable for attaching the electrodes to the scalp, but not in a very durable way, so they tend to go off when you try to use the computer at the same time. Also the sticky, waxy paste makes you want to wash your hair afterwards.
Silver-Chloride Electrodes


Next thing i tried were the silver chloride electrodes from Florida Research Instruments, with the accompanying headband.
These electrodes can be used dry, and also have a hole to insert electrode gel with a syringe. This was often necessary, since it is not always possible to apply enough pressure with the headband. Unfortunately, once soaked in gel, the electrodes degrade within a few days. Maybe because of an electrochemical reaction with the electrode clip metal, the silver layer dissolves and exposes the underlying plastic the electrode is made of.
I experimented with casting massive silver electrodes, which is actually not that expensive. I have not yet tried to electrochemically convert the surface to silver chloride, but it works quite well with the silver alone.
[Insert Picture]
Ultracortex
 A few weeks ago, the OpenBCI guys released the revised version of the Ultracortex. Build
Manual
A few weeks ago, the OpenBCI guys released the revised version of the Ultracortex. Build
Manual
I was happy to see that they used the same electrodes from FRI, since i already had them.
A spring mechanism presses the electrodes down to the head, which ensures a good contact without any electrode paste or gel.
The only problem i had is that i did not use stainless steel screws to mount the electrode. This lead to an interesting result: The electrode surface has started to dissolve, and the screws head rusted dramatically. Fortunately this process stopped at some point, and the electrode is still working. (Insert Picture)
The new Kickstarter campaign announces an updated version with even more electrode sites. I am not sure what is their intention, since they did not announce a new OpenBCI version with more channels, but actually one with less.
Software
OpenBCI_GUI
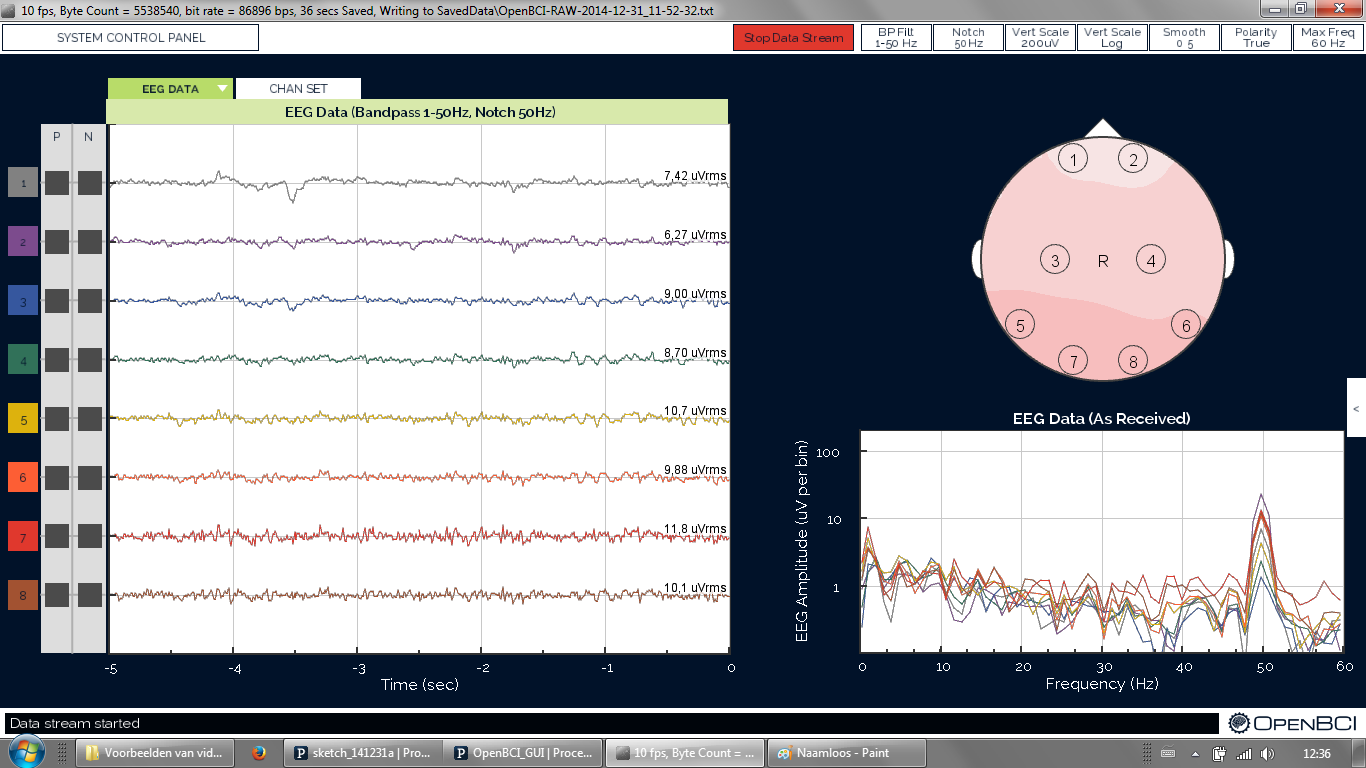
The official software that comes with the OpenBCI is a very basic visualization tool, but handy for checking the electrode condition before using other software. It also supports the impedance checking feature of the ADS1299. This works by injecting a constant current at a certain frequency (in this case 31.2 Hz), and then measuring the voltage that appears at this frequency. This way, the resistance of the electrode can be calculated. What i find really weak is that they removed the download link a few month ago, and replaced it with a note saying “coming soon”. So you have to download the source code from Github, and execute it with processing.
BrainBay
One of the first softwares that added support for OpenBCI was BrainBay. It aims at doing neurofeedback, and closely resembles the user interface of BioExplorer, allthough the GUI has some quirks that make it less comfortable to use. It is limited to Windows platform, and this probably will not change, since the source code is closely tied with the Win32 API. It runs fine on WINE though.
OpenVIBE
This seems to be the most advanced software for BCI research, and ships an OpenBCI driver for some time now. Main problem for me is that it only runs on Windows and Linux, since i am stuck with my Macbook for now. Check out the P300 Speller tutorial.
OpenNFB
OpenNFB is my software project, that i started to create a new neurofeedback solution. I do not like the visual programming paradigm that is present in most commercial Neurofeedback software, like BioExplorer, Bioera, and also BrainBay, so my goal is to create a live coding experience with Python.
The project can be found on GitHub, but there is not much documentation yet. This will change when i prepare for the first release. Before that i will have to improve the signal processing performance (probably by switching to GnuRadio as a backend), and fix some bugs with the GUI creation. I recently discovered that the Faust programming language is doing something very similar, in the domain of audio generation and processing, so i might take some inspiration there.
Design goals for BetterBCI
I am working on a new EEG amplifier, that will be very similar to the OpenBCI, but addresses the previously mentioned issues.
- Use HC05 Bluetooth module for increased data rate
- More processing power with an STM32 family µC
- Extendable beyond 16 Channels
- Support for active electrodes based on AD8442
- Integrated charging circuitry for single Lithium Cells
- Programming and Charging cable with integrated galvanic isolation, also allowing wired data transfer